

Now that the Annual Stampin’ Up! catalog has been around for a couple of weeks and you have had a chance to browse through it a few times, which stamp sets are your favorite? Let me know! This way I can come up with ideas with your favorites. Be sure to share your creations on my Facebook page as well! I’d love to see what you are creating!
Abstract Impressions is definitely in my top ten list of stamp sets in the New Stampin’ Up! Annual Catalog! I love the clean and simple look that this set lends itself to.
Today I will share with you a couple of ways to use this Two Step Stampin, photopolymer stamp set. I must also mention that this set is offered in the Abstract Impressions bundle, which includes the Abstract Impressions Stamp set and the Springtime Impressions Thinlets Dies. Purchasing both together will allow you a 10% savings.
With this set you may create glorious gardens with images inspired by Impressionist art
Here is a brief picture tutorial of how to create an easy two step stampin’ Card.
Two-Step Stamping
All of Stampin’ Up’s 2-Step stamp sets are in photopolymer because being able to see where you are stamping is important for 2-Step stamping. If you have any of our older 2-Step stamp sets, the stamps may be red rubber (clear or wood mount) and for those, I would recommend using our new Stamparatus for easy placement.


Instructions
- Cut Shaded Spruce CS 5 1/2” x 4 1/4”, 2 Whisper White CS 5 1/4” x 4”, need a 4” x 4” Pinapple Punch CS to thinlit cut flowers
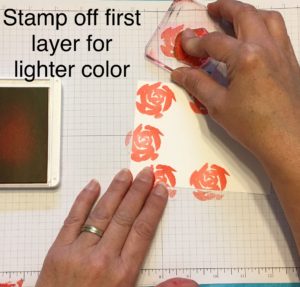
- On Whisper White CS, stamp first layer of the flower using Poppy Parade ink pad, but first stamp off the ink on scrap paper to get a lighter shade.
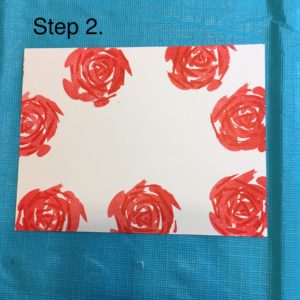
- Stamp second layer using Poppy Parade full color
- Stamp third layer using Lovely Lipstick InColor Ink Pad
- Continue Stamping traditionally, the leaves in Shaded Spruce Ink and the flower in Pineapple Punch ink. Stamp the sentiment using Shaded Spruce ink.
- Using the Springtime Impressions Thinlets Dies, cut 3 small flowers using Pinapple Punch CS, layer on card front using glue dots. Use a small Clear Rhinestone for the center of the flower.
- Fold Shaded Spruce CS in half. Adhere stamped card front onto Shaded Spruce Card.
- Stamp the inside of card as shown in the photo using steps 2 – 5
- Don’t forget to stamp the envelope too!
INgredients
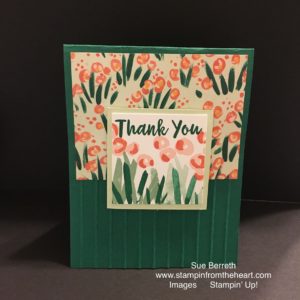
Thank You Card
Instructions
1. Cut Whisper White CS 5 1/2” x 4 1/4”, 2 1/4” x 2 1/4”
2. Cut Shaded Spruce CS 5 1/4” x 4”
3. Cut Soft Sea Foam CS 2 1/2” x 2 1/2”
4. Cut Garden Impressions DSP 3 3/4” x 3”
5. Two Step Stamp on 2 1/4” x 2 1/4” Whisper White CS as shown in photo
6. Emboss Shaded Spruce CS using Simple Stripe Embossing Folder
7. Layer all CS as shown in photo using Snail adhesive. Use Dimentionals to pop up the top square.
Ingredients
Please sign up for my newsletter for additional inspiration and share this blog with your friends!